
How to Fix Forward Head Posture: 7 Steps
Table of Contents
- What Is Forward Head Posture and Why It Matters
- Common Causes: Screen Use, Phone Use, and Daily Habits
- Assess Your Posture: Self-Check for Forward Head Position
- Forward Head Posture Exercises: Chin Tucks and Neck Retractions
- Tech Neck Stretches and Upper-Back Mobility Work
- How Long Does It Take to Improve Forward Head Posture
- Sleeping Position for Neck Alignment and Recovery
- Ergonomics and Behavior Change: Prevent Relapse
- When to Seek Medical Assessment
- Frequently Asked Questions
Last Updated: October 18, 2026
What Is Forward Head Posture and Why It Matters
Forward head posture is a misalignment where your head sits in front of your shoulders instead of directly above them. This happens gradually over months or years. Most people don't notice until neck pain or stiffness becomes constant.

Your head weighs about 10-12 pounds. When it's in neutral alignment, your neck muscles barely work. But for every inch your head moves forward, your neck feels an extra 10 pounds of pressure. That's why forward head posture causes so much strain.
This postural problem doesn't just hurt. It affects your sleep quality, your ability to focus, and your confidence. The good news: you can fix it. The process takes time and consistency, but the results are worth it.
Fixing forward head posture requires three things: targeted exercises, ergonomic changes, and nighttime support. This guide walks you through all three.
Common Causes: Screen Use, Phone Use, and Daily Habits
Modern life creates forward head posture. Screens are everywhere. Your phone is in your hand. Your desk job keeps you hunched. Over time, these habits reshape your posture.
Screen use is the biggest culprit. When you look at a monitor, you naturally lean forward. Your eyes pull your head down and forward. After eight hours at a desk, your neck muscles are exhausted. They stay tight even after work.
Phone use makes it worse. You're looking down at a small screen multiple times per hour. This is called "tech neck" for a reason. The repeated forward head position trains your muscles to stay shortened.
Other common causes include:
- Weak upper back muscles that can't support your head
- Tight chest muscles that pull your shoulders forward
- Poor sleeping position that strains your neck all night
- Carrying heavy bags or backpacks on one shoulder
- Stress and tension that make you hunch your shoulders
The longer you spend in forward head posture, the more your muscles adapt to it. Your deep neck flexors weaken. Your chest tightens. Your upper back becomes stiff. Breaking this cycle takes effort, but it's completely possible.
Assess Your Posture: Self-Check for Forward Head Position
Before you start fixing forward head posture, check if you actually have it. Many people think they do but don't. Others have it without realizing.
The wall test is the simplest check. Stand with your back against a wall. Your heels, buttocks, and shoulders should touch the wall. Now try to touch the back of your head to the wall without tilting your chin up. If you can't, you likely have forward head posture.
The mirror test works too. Stand sideways in front of a mirror. Look at where your ear sits relative to your shoulder. In neutral posture, your ear should align with your shoulder. If your ear is in front of your shoulder, your head is too far forward.
Take a photo from the side. Have someone take a picture of you standing naturally. Look at the photo. Does your head jut forward? Does your upper back round? These are clear signs of postural misalignment.
Track your posture throughout the day. Most people have the worst posture when they're tired or focused on work. Notice when your head drifts forward. That awareness is the first step to changing it.
Forward Head Posture Exercises: Chin Tucks and Neck Retractions
Chin tucks and neck retractions are the anchor exercises for forward head posture because they train the deep neck flexors, the small muscles at the front of your cervical spine that pull your head back over your shoulders. But the exercise only works if you can do it without pain, with the right dose, and with a plan to progress. This section covers the standard version, then the regressions and progressions most guides skip.
How to do a chin tuck:
- Sit or stand tall with your shoulders relaxed and your eyes level.
- Without tilting your head up or down, glide your chin straight back, think "make a double chin," not "nod."
- You should feel a gentle stretch at the base of your skull and a light contraction at the front of your throat.
- Hold 2-3 seconds, then release slowly.
- Do 10-15 repetitions, 2-3 times per day.
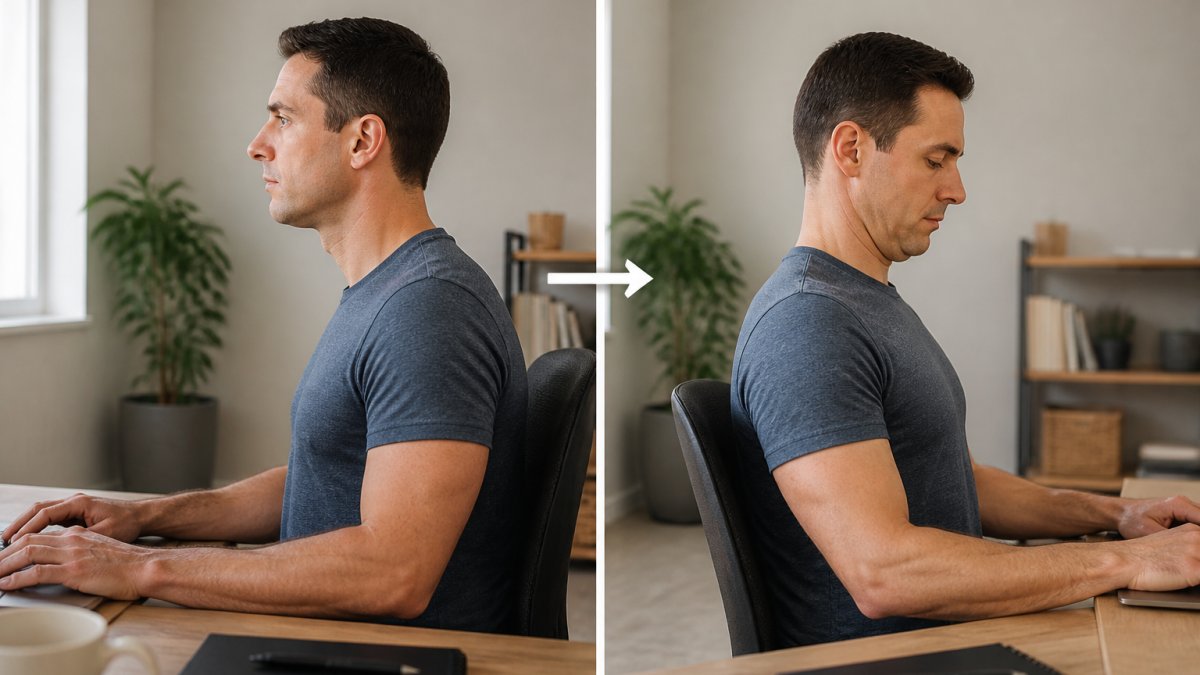
How to do a neck retraction:
- Sit tall with shoulders relaxed and eyes forward.
- Draw your entire head straight back, not just your chin, as if your head were sliding back on a shelf.
- Feel the stretch through the back of your neck.
- Hold 3-5 seconds, return to start, and repeat 8-10 times, once or twice daily.
Common mistakes to avoid:
- Tilting the head up or down instead of gliding straight back
- Moving fast; slow, controlled reps recruit the deep muscles better
- Holding your breath
- Shrugging the shoulders or clenching the jaw
- Pushing into pain, this should feel like effort, not strain
Regressions: If Standard Chin Tucks Hurt or Feel Wrong
Not everyone can do a seated chin tuck comfortably on day one. If you feel pinching, dizziness, or increased pain, back off to one of these:
- Supine chin tuck (lying on your back). Lie on the floor with knees bent, head supported on a thin towel. Nod gently as if saying "yes," then glide the head back along the floor. Gravity and the floor give feedback, making this the easiest version to learn.
- Wall-supported chin tuck. Stand with your back against a wall, heels a few inches out. Gently press the back of your head toward the wall without tilting your chin up. Hold 2 seconds, 8-10 reps.
- Seated chin tuck with a towel roll. Place a small rolled towel behind your neck for proprioceptive feedback, then perform the standard tuck.
Progressions: When the Standard Version Gets Easy
Once 15 clean reps feel effortless, add load or complexity rather than more reps:
- Long-lever chin tuck. Lie on your back with your head off the edge of a bed (supported by your hand at first), and perform slow tucks through a larger range.
- Chin tuck with head lift. From the supine position, tuck the chin, then lift the head 1-2 inches off the floor and hold 5-10 seconds. Start with 5 reps.
- Standing chin tuck with band resistance. Loop a light resistance band around the back of your head and anchor it in front of you; tuck against gentle resistance.
- Chin tuck hold with breathing. Hold the tuck for 10 seconds while breathing normally, this trains endurance, which matters more than raw strength for posture.
Pain Rules and Dosing
- Mild muscle fatigue is fine; sharp pain, numbness, tingling, or dizziness is not. Stop and reassess if any of those appear.
- Soreness the next day should be mild and diffuse. If it is sharp or one-sided, reduce volume by half.
- Frequency beats intensity. Two short sessions (5 minutes) daily outperform one long session weekly.
- Progress every 1-2 weeks, not every session. Postural muscles adapt slowly.
Tech Neck Stretches and Upper-Back Mobility Work
Stretching alone won't fix forward head posture, but it's essential. Tight muscles resist change. Stretching creates space for your body to move into better alignment.
Chest stretches are critical. Tight chest muscles pull your shoulders forward, which pulls your head forward too. Opening your chest helps your whole posture improve.
Doorway chest stretch:
- Stand in a doorway
- Place your forearm on the door frame at shoulder height
- Step through the doorway until you feel a stretch across your chest
- Hold for 20-30 seconds
- Repeat 2-3 times on each side
Neck stretches target the muscles directly involved. Gentle stretching reduces tension and improves mobility.
Lateral neck stretch:
- Sit tall
- Tilt your right ear toward your right shoulder
- Hold for 15-20 seconds
- Return to center
- Repeat on the left side
- Do 2-3 repetitions per side
Upper back mobility is often overlooked. When your thoracic spine is stiff, your neck compensates. Improving upper-back mobility helps your entire postural chain.
Cat-cow stretch for thoracic mobility:
- Get on your hands and knees
- Arch your back and look up (cow pose)
- Round your spine and tuck your chin (cat pose)
- Move slowly between these positions
- Perform 10-15 repetitions
Do these stretches daily. Spend at least 10 minutes per day on mobility work. Combine stretching with strengthening exercises for the best results.
How Long Does It Take to Improve Forward Head Posture
This is the question everyone asks. The answer depends on how long you've had forward head posture and how consistent you are.
Most people see noticeable improvement within 3-4 weeks of doing targeted exercises daily. Your neck feels less tight. Your headaches decrease. Your shoulders feel lighter.
Significant postural change takes 8-12 weeks. This is when your muscles have adapted to new positions. Your deep neck flexors are stronger. Your chest is more open. Your upper back has better mobility.
Complete correction can take 3-6 months or longer. If you've had forward head posture for years, your body has deeply ingrained these patterns. Changing them takes time. But every week brings improvement.
The timeline also depends on your commitment. If you do exercises once per week, progress will be slow. If you commit to daily work, you'll see faster results. Consistency matters more than intensity.
Realistic expectations matter. You won't fix forward head posture overnight. But you absolutely can fix it. Thousands of people have done it. You can too.
Sleeping Position for Neck Alignment and Recovery
Your sleeping position matters enormously. You spend 7-9 hours in bed (the CDC). Poor neck alignment during sleep undoes daytime progress.
Back sleeping is ideal for neck alignment. Your head, neck, and spine stay in a straight line. There's no rotation or twisting. This is the best position for fixing forward head posture.
Side sleeping works if done correctly. Use a pillow that fills the gap between your neck and the mattress. Your neck should stay neutral, not bent up or down. The right pillow support makes side sleeping effective.
Avoid stomach sleeping. This position rotates your cervical spine and strains your neck. If you're a stomach sleeper, gradually transition to back or side sleeping.
Pillow selection is critical. A pillow that's too high or too low keeps your neck misaligned all night. Your pillow should support the natural curve of your cervical spine. It should fill the gap between your neck and mattress without being too firm or too soft.
Many people find that a quality cervical pillow accelerates their progress. The Cervinest Orthopedic Pillow for Neck Pain is designed to cradle your head and fill that gap properly, supporting natural alignment throughout the night. This consistent nighttime support helps your daytime exercises work better.

Ergonomics and Behavior Change: Prevent Relapse
Exercises build capacity; ergonomics and habits determine whether that capacity survives the workday. Most people relapse not because the exercises failed but because eight hours of screen time re-train the old pattern faster than 10 minutes of chin tucks can undo it. This section pairs the setup with the behavior-change mechanics that make it stick.
Screen positioning is the foundation. The top third of your monitor should sit at or slightly below eye level, and the screen should be roughly an arm's length away. If you use a laptop, a stand plus an external keyboard and mouse is the single highest-impact change, laptops force the head down and forward by design.
Keyboard and mouse placement matters. Elbows near 90 degrees, wrists neutral, mouse close to the body. When the arms are positioned wrong, the whole trunk leans forward to compensate.
Phone use needs boundaries. Hold the phone at eye level rather than looking down. The average person checks a phone dozens of times a day; each glance down is a mini-repetition of the posture you're trying to undo.
Desk setup checklist:
- Monitor at arm's length, top of screen at eye level
- Keyboard and mouse close to the body
- Chair supports the lower back; feet flat on floor or footrest
- Shoulders relaxed, not shrugged
- Phone propped or held up, not cradled low
The Behavior-Change Mechanics Most Guides Skip
A checklist only works if you actually follow it. Three mechanics do most of the work:
- Cue stacking. Attach a posture check to something you already do, every time you open email, every time you take a sip of water, every time you stand up. The cue does the remembering for you.
- Reduce friction. Put the laptop stand on the desk before you sit down. Keep the phone charger at eye level. Make the good posture the default, not a decision.
- Movement breaks beat static perfection. No one holds perfect posture for eight hours. Every 30-45 minutes, stand, walk for 60 seconds, and do 5 chin tucks. Movement resets the muscles better than trying to "sit up straight" all day.
A Simple Self-Monitoring Plan
You can't fix what you don't measure, but you don't need a lab. Use two cheap trackers:
- Side-view photo, once a week. Same spot, same stance, same phone height. Compare week to week, not day to day, posture fluctuates.
- A 0-10 symptom log. Rate neck tightness and headache intensity each evening. A downward trend over 3-4 weeks is a better signal than any single photo.
Neither is a diagnostic test; they are feedback tools to tell you whether your plan is working.
Awareness Is the Multiplier
Notice when your head drifts forward, then gently pull it back. At first this feels constant; within a few weeks the corrected position starts to feel normal and the old slouch feels wrong. That shift, not any single exercise, is the real sign the habit is changing.
When to Seek Medical Assessment
Most forward head posture improves with exercises and ergonomic changes. But some situations need professional evaluation.
See a doctor if you have:
- Severe neck pain that doesn't improve with exercises
- Numbness or tingling in your arms or hands
- Weakness in your arms or hands
- Dizziness or balance problems
- Headaches that worsen despite posture work
- Pain that radiates down your arm
- Difficulty swallowing
These symptoms suggest nerve involvement or other underlying issues. A healthcare provider can rule out serious conditions. They can refer you to physical therapy if needed.
Physical therapy can accelerate progress. A therapist assesses your specific postural patterns. They create a customized exercise plan. They identify compensations you're not aware of. This professional guidance often produces faster results than self-directed work.
Imaging is rarely necessary. X-rays and MRIs often aren't needed for forward head posture. Your symptoms and physical assessment tell the story. Imaging becomes relevant only if your doctor suspects structural damage or nerve compression.
The key is listening to your body. If something feels wrong, get it checked. Most neck issues respond well to the right approach. But professional guidance helps when self-care isn't enough.
Forward head posture is fixable. You don't have to live with neck tension and poor alignment. The exercises in this guide work. The ergonomic changes work. The consistency is what matters.
At Cervinest, we believe proper neck support matters during sleep and throughout your day. Our cervical pillows cradle your head and maintain natural alignment, helping your daytime work pay off. The Pillow for Neck and Shoulder Pain supports both side and back sleepers while reducing tension from daily stress. Combined with the exercises and habits in this guide, proper pillow support accelerates your path to pain-free posture. Start your journey today with Cervinest and wake up without neck tension.
Frequently Asked Questions
How long does it take to improve forward head posture with exercises?
Most people notice improvement in neck tension and posture awareness within 2-4 weeks of consistent daily exercise. Measurable postural changes typically take 6-12 weeks of regular chin tucks, stretches, and strengthening work. Results depend on exercise frequency, adherence, and how long you've had forward head posture. Combining exercises with ergonomic adjustments and proper sleeping position for neck alignment accelerates progress significantly.
Can forward head posture cause headaches and other symptoms?
Yes. Forward head posture strains the cervical spine and neck muscles, commonly triggering tension headaches, shoulder pain, and upper-back stiffness. The misalignment increases pressure on deep neck flexors and postural muscles, leading to muscle fatigue and referred pain. Many people experience morning soreness and reduced mobility. Addressing posture through exercises, ergonomics, and supportive sleep solutions like an orthopedic pillow can reduce these symptoms.
What's the best sleeping position for neck alignment?
Back and side sleeping are ideal for maintaining neutral posture and cervical spine alignment. Back sleeping distributes weight evenly; side sleeping works if your pillow fills the gap between your neck and mattress. Avoid stomach sleeping, which twists the cervical spine. A contoured cervical pillow that supports the natural curve of your neck helps maintain alignment throughout the night, allowing overworked neck muscles to relax and recover.
Can I fix forward head posture with a pillow alone?
A pillow is one part of the solution, not a complete fix. While a supportive cervical pillow maintains alignment during sleep and helps your neck muscles relax, fixing forward head posture requires daily exercises, ergonomic adjustments, and conscious posture awareness. Combine your pillow with chin tucks, stretches, and proper desk setup to address the root causes of tech neck and poor posture habits.