
How to Maintain Spinal Alignment: A Step-by-Step Guide
Table of Contents
- What You Need to Know About Spinal Alignment
- Signs of Poor Spinal Alignment and When to Seek Help
- Step 1: Assess Your Current Posture and Alignment
- Step 2: Correct Your Spinal Alignment While Sitting
- Step 3: Master Proper Standing Posture
- Step 4: Learn Safe Lifting and Bending Techniques
- Step 5: How to Sleep with Proper Spinal Alignment
- Step 6: Daily Spinal Alignment Exercises
- Step 7: Build Flexibility and Mobility Into Your Routine
- Track Your Progress and Adjust
- Frequently Asked Questions
Last Updated: October 12, 2026
What You Need to Know About Spinal Alignment
Spinal alignment is the proper positioning of your vertebrae so they stack naturally without excessive strain. When your spine is aligned correctly, your head sits over your shoulders, your shoulders sit over your hips, and your weight distributes evenly through your body.
Poor alignment creates tension. Your muscles work harder to support a spine that's out of position. Over time, this leads to chronic pain, stiffness, and reduced mobility. The good news: alignment is something you can improve through daily habits and intentional practice.
This guide walks you through seven practical steps to maintain spinal alignment, starting with assessment and moving through sitting, standing, lifting, sleep, exercise, and flexibility work.
The goal isn't perfection. It's consistency. Small corrections practiced daily add up to significant improvements in how you feel.
Signs of Poor Spinal Alignment and When to Seek Help
Common signs of misalignment include:
- Chronic neck or lower back pain
- Tension headaches, especially after work
- Shoulder tightness and stiffness
- Forward head posture (your head juts forward)
- One shoulder higher than the other
- Difficulty turning your head without pain
- Waking up with stiffness that takes hours to improve
You should seek medical care if you experience:
- Severe pain that doesn't improve with rest
- Pain radiating down your arm or leg
- Numbness or tingling in your hands or feet
- Loss of bladder or bowel control
- Pain following a fall or injury
- Persistent pain lasting more than 6 weeks despite self-care
A healthcare provider can rule out underlying conditions like herniated discs or arthritis. Once you've confirmed there's no serious injury, the steps in this guide become your foundation for improvement.
Step 1: Assess Your Current Posture and Alignment
Before you change anything, understand where you are now. Most people don't realize how far their posture has drifted until they actually look.
How to assess yourself:
Stand in front of a mirror in your normal posture. Don't try to "fix" it, just stand naturally. Look for these markers:
- Are your ears directly over your shoulders?
- Do your shoulders sit level, or is one higher?
- Is your chest open, or are you rounded forward?
- Are your hips level?
- Do your knees lock, or are they slightly bent?
- Are your feet hip-width apart?
Take a side-view photo if possible. This gives you a baseline to compare against as you improve. Many people are shocked to see how far forward their head sits or how rounded their shoulders have become.
Now check your sitting posture at your desk. How far is your screen from your eyes? Where are your feet? How much do you slouch after an hour of work? These observations become your starting point.
Step 2: Correct Your Spinal Alignment While Sitting
Most people spend 8+ hours sitting. If your sitting posture is poor, you're reinforcing misalignment for the majority of your day.
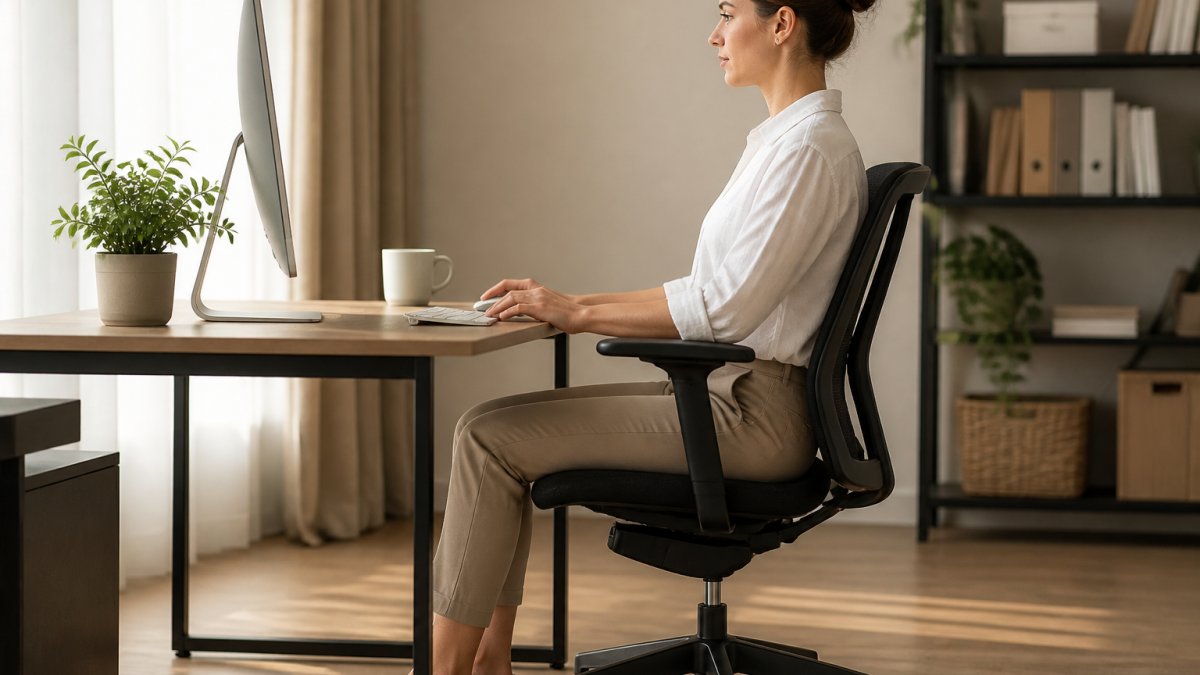
Ergonomic Workstation Setup
Your environment either supports good posture or fights against it. Here's how to set it up right:
Screen positioning:
- Place your monitor arm's length away
- The top of your screen should be at eye level when you look straight ahead
- If you use a laptop, elevate it on a stand, never look down at the screen
Chair and desk height:
- Your feet should rest flat on the floor or footrest
- Your knees bend at roughly 90 degrees
- Your elbows rest at 90 degrees when your arms are at your sides
- Your lower back should have support, use a lumbar pillow if your chair doesn't provide it
Keyboard and mouse:
- Keep both close to your body to avoid reaching
- Your wrists should stay neutral, not bent up or down
Daily Sitting Habits to Practice
Setup matters, but habits matter more. Even a perfect desk won't help if you slouch within 20 minutes.
Practice this routine:
- Sit with your back against the chair
- Lengthen your spine, imagine a string pulling the top of your head upward
- Relax your shoulders down and back
- Keep your chest open
- Rest your feet flat
Set a timer for every 30 minutes. When it goes off, stand up, stretch, and move. Sitting in perfect alignment for 8 hours straight is impossible. Movement breaks are essential.
Step 3: Master Proper Standing Posture
Standing posture sets the foundation for everything else. When you stand well, you reduce strain on your spine and build better movement habits.
How to find neutral standing posture:
- Stand with your feet hip-width apart
- Let your arms hang naturally at your sides
- Lengthen your spine, shoulders back and down
- Engage your core lightly, not a tight brace, just awareness
- Keep your knees slightly bent, not locked
- Distribute your weight evenly across both feet
Your ears should align with your shoulders, shoulders with your hips, and hips with your ankles. This is neutral spine.
Common mistakes to avoid:
- Locking your knees (creates tension in your lower back)
- Arching your lower back excessively (puts pressure on your lumbar spine)
- Letting your head jut forward (strains your neck)
- Shifting weight onto one leg (creates imbalance)
Practice standing this way for 60 seconds at a time. It feels awkward at first because your muscles aren't used to it. That's normal. Consistency builds the habit.
Step 4: Learn Safe Lifting and Bending Techniques
How you lift and bend determines whether you're protecting or damaging your spine. Small technique changes prevent injury.
Safe lifting technique:
- Bend at your knees, not your waist
- Keep the load close to your body
- Engage your core before you lift
- Use your leg muscles, not your back
- Avoid twisting, pivot on your feet instead
- Keep your spine neutral throughout the movement
Safe bending technique:
- Bend at your knees and hips
- Keep your back straight (not arched, not rounded)
- Lower yourself with control
- If something is heavy, ask for help or use equipment
The key principle: keep loads close and your spine neutral. Distance and rotation create strain.
Step 5: How to Sleep with Proper Spinal Alignment
You spend roughly a third of your life in bed. That's thousands of hours where your spine is either supported in neutral or held in a strained position. Sleep position and bedding are two of the most controllable inputs you have.
The goal is simple: keep your head, ribcage, and pelvis stacked so your spine holds its natural curves. The challenge is that the right setup depends on how you sleep, your body size, and your mattress.
Back sleeping
Back sleeping is the easiest position to keep neutral because gravity isn't pulling your spine into rotation.
- Pillow height: Use a pillow that fills the gap between the back of your neck and the mattress without pushing your chin toward your chest. If your chin tilts down, the pillow is too thick. If your neck feels unsupported, it's too flat.
- Knee support: A pillow or rolled towel under your knees takes tension off your lower back by flattening the lumbar curve slightly. This is especially helpful if you have a pronounced arch.
- Arm position: Keep arms at your sides or resting on your stomach. Arms overhead can pull your shoulders into an elevated position that strains the upper back over time.
Side sleeping
Side sleeping is the most common position and can work well if you keep your hips and shoulders stacked.
- Pillow height: The pillow should fill the space between your ear and the mattress so your head stays level with your spine. A pillow that's too thin lets your head drop; too thick and your neck bends upward.
- Knee pillow: Place a pillow between your knees. This keeps your top hip from rolling forward and rotating your lower back. It also reduces pressure on the hip you're lying on.
- Avoid the fetal curl: A slight bend in the knees is fine, but curling tightly rounds your upper back and pulls your shoulders forward.
- Rotate sides: Sleeping on one side every night loads the same shoulder and hip repeatedly. Switching sides spreads the load.
Stomach sleeping
Stomach sleeping is the hardest position to make neutral because your neck has to rotate to one side and your lower back tends to arch.
- If you can't change positions, use a very thin pillow or none at all under your head, and place a flat pillow under your pelvis to reduce the lumbar arch.
- A better long-term goal is to transition to your side by placing a body pillow in front of you and gradually rolling onto it.
Mattress and pillow considerations
Mattress firmness matters as much as pillow choice. A mattress that's too soft lets your hips sink lower than your shoulders, which twists your spine. One that's too firm creates pressure points at the shoulders and hips. Most people do best with a medium-firm mattress that supports your curves without creating gaps.
Pillow materials change how support behaves through the night:
- Memory foam holds its shape and can be contoured to your neck, but it traps heat and can feel too firm for some sleepers.
- Latex is more responsive and cooler, but heavier and more expensive.
- Down or down-alternative is soft and moldable but loses loft quickly and offers less neck support.
- Water-based or adjustable pillows let you fine-tune height, which can help if you switch between back and side sleeping.
A collapsed pillow no longer fills the neck gap, no matter how well you position it.
If you wake with neck stiffness that eases within an hour of moving around, your sleep setup is a likely contributor. If stiffness or pain persists through the day, that's a signal to look beyond the pillow.
Step 6: Daily Spinal Alignment Exercises
Before the exercises, one honest framing: movement and strengthening can improve comfort, endurance, and how you carry yourself, but they don't physically straighten a spine that has a structural curve. What they do well is build the muscular support that makes good alignment easier to hold and reduces the strain that comes from weak or tight areas.
If you have a diagnosed condition, scoliosis, osteoporosis, a prior spinal surgery, or persistent pain, check with a clinician or physical therapist before starting. Some movements that are fine for a healthy spine are inappropriate when bone density is low or a segment is healing.
A beginner routine you can actually repeat
These five movements cover the main areas that support alignment: spinal mobility, neck posture, upper back strength, glute and hip strength, and core stability. Do them in order.
- Cat-Cow, On hands and knees, alternate arching and rounding your spine. Move slowly, one segment at a time. 8 to 10 reps. This is a mobility drill, not a strength exercise, so keep the effort easy.
- Chin Tucks, Sit or stand tall. Draw your chin straight back as if making a double chin, without tilting your head down. Hold 3 seconds, 10 to 15 reps. This targets the deep neck flexors that counter forward head posture.
- Shoulder Blade Squeezes, Sit or stand with arms relaxed. Squeeze your shoulder blades together and slightly down, as if holding a pencil between them. Hold 3 seconds, 10 to 15 reps. This activates the mid-back muscles that hold your shoulders back.
- Glute Bridges, Lie on your back, knees bent, feet flat. Push through your heels to lift your hips until your body forms a straight line from knees to shoulders. Hold 2 seconds, 10 to 15 reps. Strong glutes take load off your lower back.
- Plank Hold, On forearms and toes, keep your body in a straight line from head to heels. Start with 15 to 20 seconds and build toward 60 seconds. If your lower back sags, stop the set, that's the point where form breaks down.
How to progress safely
Start with one set of each, three days per week, for the first two weeks. If you finish without increased pain or next-day soreness that lingers past 48 hours, add a second set. After four weeks at two sets, add a third. This is a gradual build, not a race.
Progress by:
- Adding reps before adding sets
- Adding sets before adding load
- Increasing hold times in 5-second increments
- Slowing the movement down to increase control
Stop and reassess if any exercise causes sharp pain, pain that travels down an arm or leg, or numbness or tingling. Those are not normal training sensations.
Modifications for common situations
- Low back sensitivity: Skip or reduce the range on Cat-Cow and keep glute bridges small. A pelvic tilt lying on your back is a gentler starting point.
- Neck pain: Do chin tucks lying down instead of sitting, and keep the hold short.
- Pregnancy: Avoid lying flat on your back after the first trimester. Side-lying exercises and supported standing movements are usually better options, but confirm with your provider.
- Osteoporosis: Avoid loaded spinal flexion and twisting. A physical therapist can tailor a safe program.
What to expect
Changes in how you habitually hold yourself tend to take longer, often six to twelve weeks, because you're retraining patterns, not just muscles. If nothing changes after six to eight weeks of consistent effort, or if symptoms worsen, that's a reason to get an assessment rather than push harder.

Step 7: Build Flexibility and Mobility Into Your Routine
Strong muscles matter, but flexibility prevents strain. Tight muscles pull your spine out of alignment.
Daily stretching routine (10 minutes):
- Neck Stretch, Tilt your ear toward your shoulder. Hold 20 seconds each side. Don't force it.
- Chest Opener, Clasp your hands behind your back. Straighten your arms and lift your chest. Hold 20 seconds.
- Spinal Twist, Sit with one leg extended. Cross the other leg over it. Twist gently toward the bent knee. Hold 20 seconds each side.
- Hip Flexor Stretch, Lunge position with back knee on the ground. Push your hips forward. Hold 20 seconds each side.
- Hamstring Stretch, Sit with legs extended. Reach toward your toes without bouncing. Hold 20 seconds.
Do these stretches after exercise when your muscles are warm. Never stretch cold muscles, you risk injury.
| Exercise Type | Frequency | Duration | Best Time |
|---|---|---|---|
| Spinal alignment exercises | 3-5 days/week | 15-20 minutes | Morning or evening |
| Daily stretching | Every day | 10 minutes | After exercise or before bed |
| Movement breaks | Every 30 minutes (sitting) | 2-3 minutes | Throughout workday |
| Sleep positioning | Every night | 8 hours | Bedtime |
Track Your Progress and Adjust
Progress isn't always linear. Some days you'll feel great. Others you'll regress. That's normal.
What to track:
- Pain levels (rate 1-10 daily)
- Posture awareness (how often you catch yourself slouching)
- Sleep quality (how rested you feel)
- Mobility (can you turn your head further without pain?)
- Exercise consistency (days completed per week)
Review your progress every two weeks. If something isn't working, adjust it. If you're improving, keep going. If you hit a plateau, add complexity to your exercises or increase frequency.
Maintain spinal alignment through consistent practice. The habits you build now become automatic over time.
If neck and shoulder tension persist despite these efforts, proper support during sleep becomes even more important. The Cervical Neck Pillow with Water Base ($61) allows you to customize support to your exact needs, adapting throughout the night. Combined with the daily practices in this guide, the right pillow helps maintain spinal alignment while you sleep, when your body does its most important repair work. Start with one change this week, add another next week, and build from there.


Frequently Asked Questions
How do I know if I have poor spinal alignment?
Common signs include persistent neck or lower back pain, tension headaches, forward head posture (chin jutting forward), rounded shoulders, and morning stiffness. You may notice yourself constantly adjusting your position or feeling fatigue in your neck and shoulders by day's end. If you experience chronic discomfort that doesn't improve with basic posture corrections, consult a healthcare provider to rule out underlying conditions.
What's the best way to sleep with proper spinal alignment?
Back and side sleeping positions are ideal for maintaining spinal alignment. Use a pillow that fills the gap between your neck and mattress, keeping your head neutral. For side sleeping, ensure your pillow height matches your shoulder width. A supportive cervical pillow, like the Orthopedic Pillow for Neck Pain ($48.00) or the Cervical Neck Pillow with Water Base ($61.00), helps cradle your head and maintain natural body alignment throughout the night.
How long does it take to see improvements in spinal alignment?
Results vary based on how long you've had poor alignment and how consistently you practice proper positioning. Combining ergonomic adjustments, daily exercises, and supportive sleep setup accelerates progress.
Can exercises alone fix my spinal alignment, or do I need additional support?
Exercises are essential for building core strength and back muscle endurance, but they work best alongside other habits. Proper posture during sitting and standing, correct lifting techniques, and supportive sleep positioning all contribute equally. Many people find that combining daily alignment exercises with a quality cervical pillow, like the Pillow for Neck and Shoulder Pain ($95.00), delivers faster, more lasting results than any single approach alone.